EDIT 2011/05/06: Wow! So this post alone has passed 100,000 views. Just wanted to say thank you to everyone for the comments. I don’t always have time to reply to all of the questions in the comments, but I’m glad this post has been helpful to so many!
Since I recently had to replace a keyboard on a laptop, and couldn’t find any resources on replacing it for this model, I thought I’d go ahead and do a run-through for anyone else who may need this.
Okay, to start with, you’ll need:
- Replacement keyboard (Part# 431414-001)
- Phillips Head Screwdriver
- Flat Head Screwdriver (for prying off cover)

Step 1: Remove RAM cover and Battery

Use your Phillips screwdriver to remove the two screws securing the RAM cover, and set it aside. Then remove the battery as well.

Step 2: Remove Necessary Screws
There are a total of eight screws that you’ll need to remove to get to the keyboard: Five black screws, and three smaller silver screws.

You’ll see a keyboard icon next to the three lower screws:


And these are what you should end up with after removing the screws.
Step 3: Remove Keyboard Shield

Next, we’ll have to remove the shield that holds the keyboard in place. You can do this using the Flathead screwdriver, fingernails, or a coin.
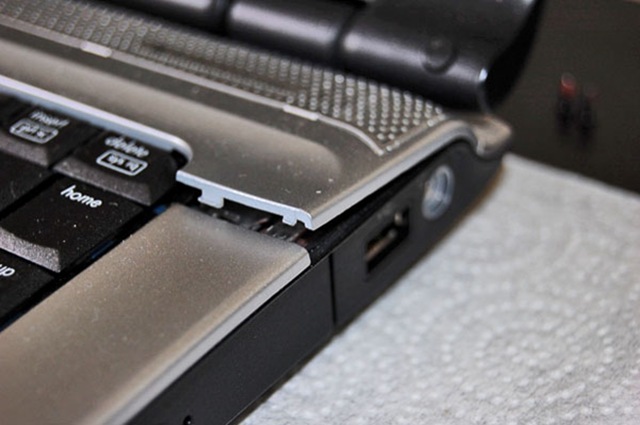
You’ll pop them up like the image above on both sides.
Once you get the cover up, be careful not to damage the flex cables beneath it.
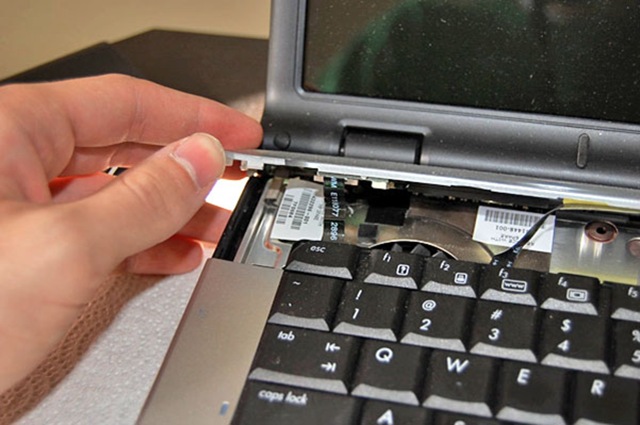
Step 4: Remove Keyboard
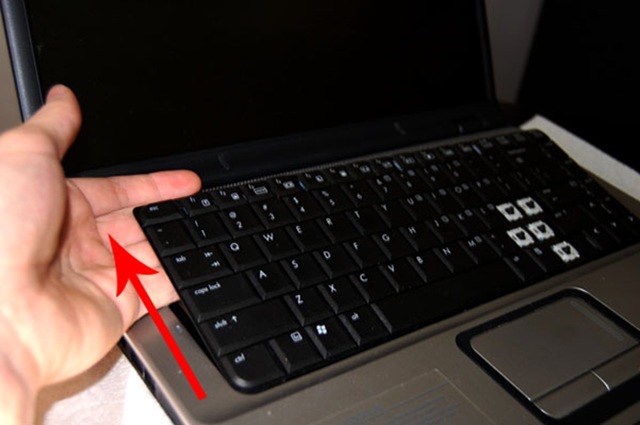
Now that you have the shield loose, you can now remove the keyboard. There is another flex cable connecting the keyboard, so don’t pull too far up on the keyboard just yet.

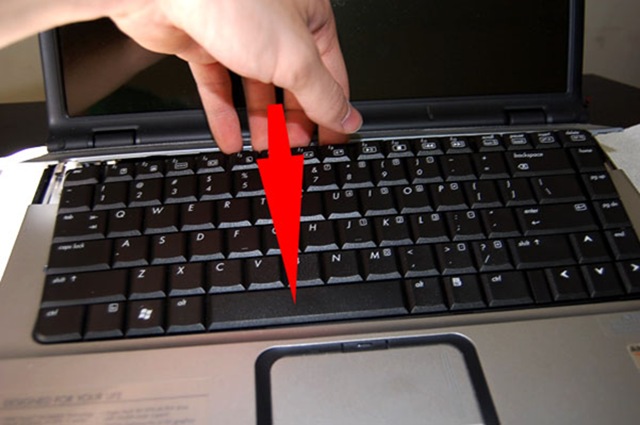
Carefully work the cable out of its slot by pulling back towards the screen.

Now you’ve got the keyboard removed, and you’re ready to reinstall the new one. Almost there!

Step 5: Install the New Keyboard

First, carefully insert the new cable into the slot. Be careful not to damage it, the cables are fragile.
Update: “The connector slot has a lever the pins are connected to the white box and the black lever at the bottom of the white box can be pulled towards the screen. This will loosen the keyboard cable. If you press that black lever back it will fix the cable.” Thanks, alex for the tip!
Now, place the keyboard back down inside the case.

Now we’ll replace the shield. Push backwards toward the screen to make sure the back latches set in place correctly, then pop the sides back down into the case until you feel them lock.

Step 6: Close It All Back Up
Now that you’ve got the keyboard back on, flip it back over onto its back, and reinstall all eight screws.

Don’t forget, the three small screws go here, under the battery.

Now, we’ll put the RAM cover back on…

…and put the battery back in.
And that’s it! As long as you’ve got the cable plugged in correctly, it should work with no problems.


hehehehehehehehe……very useful information, i’m sure
Incredible! Whoo-hoo. This clear, precise and perfectly illustrated DIY info allowed a this 53 year old techno-amateur to fearlessly change out a keyboard successfully. Only comment, getting the connection cable in was a bit of a pain and I didn’t lock it down right the first time so Alex’s advice was needed. Worked the second time.
I read two-three other sets of directions on how to do this but this was by far the best. I don’t understand why HP couldn’t have provided the how-to but it still wouldn’t/couldn’t have been at this quality.
BTW, the model I used these directions for was dv6500.
lol, yeah, but I’m sure all my Facebook friends are wondering why I posted this as a note. ;)
Facebook automatically imports all my posts as notes, so yeah. :D
thank-you I just put on new keyboard on my computer, I bought a skin to go over the keys. Hopefully it will keep my children from pulling off the keys. but I cant figure out how to put it on. do you have any suggestions how to do it?
Kevin…… that was a great posting, with pics you did on replacing a keyboard…. just one correction ya mite want to pass on…. when removing the ribbon. never pull or wiggle the ribbon toward the screen to remove it…instead , with a small tool like a pick or your finger nail…… release the little black keeper that holds the ribbon locked in under pressure for a reason….. pulling it to free it damages the end of the ribbon…. besides, u need to remove or release it to get the ribbon back into its slot…. then re lock the little black keeper, by sliding it ,on top of the ribbon end, toward the white block…. Note the black keeper has two diff surfaces… one has an off set.the other is flat…. the flat goes up toward you……. the off set side will not wedge the ribbon in tight and will slip back out very easy…. took me awhile to figure this out also….. they are so small lol….. Note.. the touch pad ribbon is a bit diff… least was on my zd8000…. the keeper and ribbon are MUCH smaller !.. and it is released by just lifting up with your finger nail. it pivots up like a hinge. making it unnessary to remove the keeper… just reinsert the ribbon end. and pivot it back down…..the point im making here is: NEVER just wiggle or pull on a zif ribbon to remove it ! we both are just helping, ok..not trying or meaning to step on your toes Kevin….
IN CASE ANYONE ELSE IS HAVING TROUBLE FIGURING OUT HOW EXACTLY TO RELEASE THE KEEPER. THIS WAS A GREAT HELP: http://h30434.www3.hp.com/t5/Hardware/How-to-Release-the-ZIF-connector-for-keyboard-on-HP-Pavilion-DV6/m-p/206721
THANKS FOR THE GREAT STEP BY STEP!
Kevin, I can’t thank you enough for showing us to replace a keyboard. I just did in under 20 minutes. My cat was loving tap dancing on my keyboard and ultimately destroyed all the keys so I really needed to replace one and although I was a little nervous trying, I did it and am glad for it.
What you did in showing us was the best.
Diane
lol it must have taken forever to post all those pics
An hour or so for the whole thing, not too bad.
Good job on this tutorial, Kevin. I didn’t even notice you were taking pictures while you did that the other day!
I wasn’t, this was when I put the new one onto her computer, she finally got it in from ebay. :)
wow, an entire hour, gone from your life forever. *_*
Great work man……….a very useful tip………
Thanks
B.T.Ram
very interesting. i’m adding in RSS Reader
Thanks for the excellent pics! I have a different HP laptop, but the basics are the same, and after spending a whopping $26 geting a new keyboard on Ebay, I was able to replace it in about 20 minutes. I appreciate you taking the time to post the pictures and document the process. Good Job!
You’re welcome! Glad it was useful for you, I know it would have been for me, haha!
You rock! My 2 1/2 yo son pulled almost every key off my wifes keyboard. I ordered a new keyboard but of course no instructions. I knew that this could be easy, or a real pain. Without your very accurate and detailed directions this would have taken me all night. Ten minutes! It seems that only fair that I should mention that my son’s name is Kevin. How appropo.
Thanks.
Steve
Thanks Kevin, you saved me $100 from what the local computer store would have charged me.
hello kevin,
thanks a lot .. u really saved ma money .. i would really appreciate that ..
tahnks a lot again ..
-prashanth
Hi,
I have a similar lap top, the problem is the screen just blurs up from time to time. I have been told that it could be the Flex Cable for screen? DO any you have any ideas on how to get at the flex cable or is this even the problem.
Rob
Robert,
Unfortunately, I have no idea on how to get to that cable. I was lucky to make it in enough to replace the keyboard without screwing it up, haha. :D
It’s possible that is your problem though. One thing you could do, just to ensure it’s a problem with the screen, is to plug an external monitor up to it and see if the problem persists.
hi kevin
i tried it. but broke my keyboard’s cable slot. what to do now. will i get those slot lever’s in market. My lap is hp6515b. please reply
Hi Kevin,
Great tutorial. I linked to these instructions from my blog.
I’m creating same kind of tutorials for Toshiba laptops, you can find them at http://www.irisvista.com
Should be useful for all Toshiba owners.
Disassemble your laptop at your own risk!
Good luck.
thank’s
detailed & useful
thak you its verry helpful
Excellent helpful guidness .. Thanks
I have two DV8000 HP laptops and I have to replace keyboards on both thanks to a one year old grandchild.. This will be extremely helpful information. I now feel confident I can do this myself.
Thanks again
Good post! Thanks for you help on my keyboard change!
****, as soon as I saw my laptop’s conection, I found out why the keyboard isnt working… mother ****** that sold me this PC had already ****** up with it inside…
The idiots superglued the keyboard cable to the conection, now I cant get it out without actually damaging the inlet…
Any tips on what to do?
Thanks very much, very good article.
Lucas
Ah man. Lucas, that sucks, did you buy it from someone online or local? Regardless, I really don’t know what to suggest, unless perhaps they make some sort of solvent for superglue that you could try, but I wouldn’t know for sure if that would work.
Nail Polish Remover has always been the crazy Glue cure (should one get it on theri skin. Of course I am not sure how it would work on computer parts, but it wounds like you have nothign to lose. :-)
Thanks for answering,
I managed to yank it out, but the inlet is completely ruined. It was actually already ruined (thats why they superglued it). This sort of thing isn’t just replaceable because the thing is welded to the mother board, so this means I’m gonna have to take it to someone who knows how to replace this sort of thing..
Well, thanks anyway man.
Lucas
Thank you so much!!!!!!!! This was so helpful!
Thank you… very useful info =]
Thanx for the helpful info! It was much easier than i thought!
Thanks for these useful infos. Can you please help me on this? My DV 6000 keyboard is not working, for example: the C, V, B, X, Z are not working, what should I do before thinking of changing the keyboard? Thanks
Kine, first thing that I would try is to just unplug the keyboard and plug it back in. You’d be amazed how often that fixes things. Otherwise your best bet probably will be to get a replacement keyboard. Make sure to keep ahold of the old one though, as you can usually* use the old keys as replacements, should you need them later.
*sometimes these keyboards have different types of key connectors, in which case you couldn’t use them for replacements.
Very nice pictures, very informative. I have the same laptop. The an is very noisy and I want to open the case and clean the dust in the fan. I have retired all the screws but the case is stuck and I do not want to broke it. I do not know how to open the case.
could anybody help me?
Thanks !! still wroking – got a part for 12.00 on Amazon.com and withyour help we did it ourselves!!!
Sorry Estebab, this was as far into the case as I could go. I’m not sure where to go from here.
Just found your instructions in a Google search. Great how-to, thanks again. Mine is a dv6645 and is exactly the same. I notice the quality of the keyboards hasn’t improved, mine is only 6 months old and the keys are shiny already, and I’m a one-finger typist!! :(.
Outstanding directions and photos for replacing the keyboard. Thank you for your time, effort, and for making this information available. I replaced my neighbors keyboard on her hp dv6000 after the shift key broke off the original keyboard. These instructions are an awesome guide. After new keyboard installed and reassembling I fired up the laptop with no issues. Now she can post those LOL’s she has been missing. Thanks again.
After failing to get any help from HP your direction where excellent and I applied them to the PAVILION dV2023 – a few less screws but it worked a treat.
Hi
its very usefull thank a lotttttttttttttttttttttttttttttttttttttttttt
GR Max
Thank you so much i run a small business fixing peoples computers but as a college student i still dont know everything your guide has saved me much pain!
Another one year old takes out a keyboard. Thanks so much–the annotated pics are worth tons of text.
hey you forgot to mention:
the connector slot has a lever the pins are connected to the white box and the black lever at the bottom of the white box can be pulled towards the screen. this will losen the keyboard cable. if you press that black lever back it will fix the cable of course. but thanks for the howto was a lot of usefull information
Thanks for the tip, Alex! I put that up in Step #5 as an update. I had no idea those were there, haha.
Thanks a lot for the wonderful guidance.. and Kevins tip fix the fibre cable was really useful..
You’re welcome! And it was Alex’s tip, not mine. :)
Good tutorial. I am going to link to it. Thanks
I have hp pavilion dv6000 notebook which has a german version keypad.
So, can i change the keypad to American version?????
does it work .
Batman, that’s actually a very good question. I certainly couldn’t tell you for sure, but this is the scenario I would imagine:
You replace the keyboard with an American keyboard, assuming the connectors are the same, and then you should be able to change your regional settings in the Control Panel to US settings. In theory, that should switch the layout over, it’s just a question of whether the two pieces of hardware would be compatible.
I got hp dv6000
i need help
you know the rubber thing on top of the screen the circle thing one fell off is thre any way to replace that
plz plz plz
help
I imagine it’s just stuck on with adhesive. The problem would be finding a replacement. Unless it’s really bothering you, I wouldn’t worry about it, it won’t hurt anything.
it makes my laptop look ugly 3 rubber crap and one screw
Thank you so much for sharing your experience. I spend one hour on the laptop before finding this guide. In fact, it is much easier than I thought. Thanks again
thanks…very helpful
thanks it is very helpful
Kevin, thank you sir. I had all the screws in the bottom removed except the one under the memory module cover. That is the ticket, I thought I was losing it. lol Great detailed instructions.
-Tom
Thanks for the helpful advice & self-explanatory pictures. Even a novice like me was ables to replace a hp keyboard in less than 10 minutes, all thanks to you.
hey i was wondering if you could also tell me how to clean ketchup of the laptop keyboard. Two keys of my keyboard arent responding well cos i spilt ketchup over them .. thank you in advance
Wow! I got this new keyboard not knowing much about the process for replacement until I opened this site up. Major props. This guide made my morning a breeze. It took 15 minutes compared to what I thought would be an hours worth of struggle. THANKS!!!!!
Hey Kevin
i have DV 6114tx mode
in total 10 keys dont work in mah keypad
they are left shift z x c v m , . / spacebar
what do u think
what should i do???????
Great guide!
I used it to get to my motherboard. Do you happen to have a guide to replacing the motherboard?
Thanks in advance
Thank you so much for this! My daughter spilled water on her laptop, and some of the keys would not work after that. I bought a new keyboard from ebay and with your tutorial was able to replace it with no problems whatsoever! Thank you!!!
Kevin,
the previous post says it all:
Thank you so much for this! My Son spilled water on her laptop, and some of the keys would not work after that. I bought a new keyboard from ebay and with your tutorial was able to replace it with no problems whatsoever! Thank you!!!
BRuce
Can anyone point me in the right direction to get a keyboard so that I can replace mine? The last thing I want to do is buy the wrong part…
Kevin,
Thank you for posting this. I’m fairly certain I wouldn’t have thought to remove the RAM cover in order to replace the keyboard. The new keyboard works perfectly, and your hour saved me at least an hour…
Best wishes,
Ed
Kyle,
I found a replacement at brilliantstore.com. I’ve purchased several replacement items from them, and they’re reliable and deliver quickly.
Thank you very much for this post. My daughter saw fit to pour mountain dew all over the keyboard of my dv6000. Luckily, the computer was ok, but all the keys were a sticky mess. Your tutorial really helped me to get the thing replaced and working perfectly. Thanks again.
Jim
Your post was extremely helpful. I am actually not sure where to order a notebook key pads for HP. I ‘d appreciate if you could tell me some websites. I ve been browsing through Hp’s website but I can’t find notebook keyboards.
Thanks in advance.
Izzah Abrar,
The easiest place to find them as far as I’m aware is eBay. If you take out the keyboard, HP should have a sticker with the part number, you could try searching for that part number on Google Shopping, and see what stores come up that sell it.
Ed above suggested brilliantstore.com. I’ve never been or purchased from there, so I cannot make a recommendation, but it might be worth checking out as well.
-Kevin
Thank-you soo much for posting this. I dropped my laptop on the concrete and the keyboard functions went absolutely wonky. F5 would refresh websites my keys stuck and than completely stopped working. I had to use a seperate keyboard jsut to use the computer, and it would still refresh all the time and hit random numbers. I took it in to a computer store and they quoted me at minimum $400. I cant afford it considering x-mas is here. I bought the piece for $10 and another $10 shipping and handling from China haha. With your instructions and pictures I did my first computer fix it job in 15 minutes. (after i had to buy a new screwdriver cause mine was stripped haha)
I just wanted to say thank-you. Without people like yourself posting these things I would have paid out the rear end for this! Thank-you very much!!
Mitchell Strachan
Medicine Hat, Alberta, Canada
oh also the connector level tip was great!! it took me a second to figure out which to move to use it, but once I knew to move the black pieces on the side of the white piece up towards the screen, it took me all of 5 seconds to put my whole comp back together! You guys are worth more than HP themselves! Thanks again
Awesome man, you just saved me 40 bucks, thats what they wanted to charge for a simple replacement, it took me at most 7 minutes. Thanks again.
Kevin,
You saved me $300.00. The reason for this is that my daughter dropped her HP laptop and the keyboard was not working, but everything else was. I thought it was just a loose wire, but wasn’t sure. Anyway, the warranty had expired just 4 days prior to the accident, and HP would not honor extending it. So I decided to trouble shoot it using your guidance, and indeed the keyboard wire was out of place. I simply connected the wire, buttoned everything back according to your instructions, and voila. It now works. Thanks for taking the time to post your easy to follow and instructions, and for saving me money.
hey, i was wondering if you knew how to replace the mouse/touchpad thing on the hp pavillion as well??
Kevin, thank you so very much for this tutorial! These directions were very easy to follow.
I know when I accidentally broke off some of these keys, I couldn’t find any easy/cheap way to get those few keys replaced. Everyone said I would have to send it in, which would cost money I just don’t have. For over a year I didn’t have any key covers on those keys – just had to use the rubber nubby things.
Now, with your help, I got a keyboard off of ebay (only 18 dollars – not bad) and just installed the new keyboard. I’m typing on it right now, actually, lol, and it works great. Plus I saved a lot of money in the process. Hurray for not needing to feel embarrassed anymore when I use this laptop in public!
Thanks again for the tutorial!
~Brandon
thank you, thank you, thank you. I would never have been able to do this without your help.
thanks,
Michele
Kevin,
Excellent guide. Changed my DV6470 keyboard from US to UK version and with your guide it was a 10 min job. Brilliant.
Have a Happy New Year!!!!!
“Geek Squad North Carolina told me that nobody’s gonna do that keyboard problem of your’s”
so i do it myself with your best help….i guess i save a lot of dollars
this was really helpful…with my new 29$ keyboard that i bought online…
The Instructions here were great BIG THANKS on this one
Thanks so much for the great info. I changed keyboard for a friend and it went flawlessly in around 5 minutes!
Brian
I have a problem with heating, i think that the cooling system i sfull with dust, so do you know how to clean the cooling system.Thank You
Great tutorial , used this to replace a troublesome keyboard on a dv6000 multimedia laptop , keys were stuck resulting in a constant beeping error code , with your help it was fixed in a trice !!
Thanks Kevin, you deserve a treat :))
Good piece.
Excellent photos and helpful Photoshops! Applied your knowledge to a V5305. Only had to remove two screws under the battery instead of the pile necessary in the later models. From all the user comments it looks like you’ve helped a lot of people. Kudos to you!
Thanks, Very nice job.
Kevin – YOU ROCK!!!
I’m a regular nobody. No talent, nothing. For $20.00 (replacement keyboard on e-bay) and $2.00 for a little, tiny screwdriver and your FABULOUS directions, I replaced my keyboard and my computer now works perfectly. God Bless you. THANK YOU SO MUCH!!!!!!!
kevin- you are amazing!
thanks for your directions . i could replace the keyboard with in 10-15 minutes.. i owe you at least 50$ what is your paypal id ? :-)
thank you so much
nakesh
Kevin,
This site looks great and I need to replace my dv6000 keyboard, do you have a recommendation for a site where I can buy a replacement keyboard? HP wants $80 for it, and I get a little nervous ordering from random sites based out of Hong Kong.
Thanks!
Brendan
Thanks Brendan! I don’t really have any recommendations other than eBay, that’s where I usually find stuff like this. Here is a link to one for $25 and free shipping that ships from California, and there’s several others on there. Just do a search for “HP dv6000 keyboard” and you’ll find plenty of results (most from Hong Kong though, haha).
Two weeks I ago my keyboard overdosed on a California Merlot. Seeking a rehabilitation expert I found your website. I ordered a new keyboard that promised to abstain from grape juice. Lo and behold the new installation when vety smoothly and now I can “backspace”, “delete” and even use the space bar. Thanks for the excellent instructions. I think I’ll toast myself.
Excellent instructions. Top row of keys (Y, U, I, O, P, etc) on our HP dv6000 stopped working. I found your instructions on the web and then ordered a keyboard (~$35) from Amazon. Keyboard surgery took me 20 – 25 minutes to complete. Computer works great and saved me from buying a new one!
Thanks and highly recommend these instructions.
– Repaired in California
Hey Kevin just wanted to say thanks a million for this tutorial not only did you help me get the job done but you also helped me impress some people I was hoping to make a great impression on. So thank you and I appreciate it. I tried leaving a longer comment but I think I maxed out your character limit : (
If you want the full testimony send me an e-mail.
Thanks so much
very useful presentation i just change my keyboard many thanks:)
Kevin:
Thanks for such great instructions. I have been looking for instructions to replace the keyboard on my Averatec 2300 series and could not find anything anywhere. Now with your instructions, I can see the similarity. I will let you know my progress. Thanks in advance.
Thanks
Hi, thanks for this, took me like 20 minutes to do it and it was easy as pie. One question though, have you ever run into the problem of the power button shield not going back in place perfectly? The right side snapped in fine but the left side won’t snap back in. The keyboard/laptop works fine no problem, its just an eyesore to have that unevenness on the left side.
Dave
David,
I’d suggest taking it back off and realigning it again. Make sure there aren’t any cables or anything bunched up and in the way, and try to push the back corners closest to the hinge into place first. It’s sort of tricky to get back on.
Dave,
I did have the same problem as well, all I really did was make sure you push a little harder on the edge that is closer to the monitor that swoops down. Took a little bit but it all snapped in nicely, I would also make sure its snapped good in the center as well.
Another satisfied reader….
$17 and 5 minutes of work, I no longer have to copy .’s to websurf. Many thanks for the superb write up Kevin.
Excellent instructions Kevin!
Thanks…very helpful :-)
Kjetil
Great Service!!!
-Ajoy
Awesome work dude…
Great pics! You rock..
Im sure I coulda figured it out, but glad I didnt have to!
Thanks man.Great instructions and pics were clear and precise. You’ve saved me $35 bucks.
Thanks! I just had to replace my HP Pavilion’s keyboard and this really helped!
One thing I would point out, the two screws near the corners (top of the photo) don’t need to be removed. I couldn’t get one of them out so I left them in and I could get the shield and keyboard out fine.
Ah okay, good to know Aaron, thanks!
WOW!
I mean, I would have figured it out… but it’s good to see someone who knows what to do and wrote about it. I’ll give it a try.
Any idea how to find the part number for my dv7? I live in Barbados BTW, not the US.
I don’t have an HP part number (what exact model do you have?) but if you search any local online stores for HP dv7 keyboards, you should find one. Post back your model and I’ll try to locate that part number though.
Easy grease. Thanks Kevin.
Peter
hi,i just want to say thankyou,thankyou,thankyou.
you are a absolute legend.
your pics and description are perfect.
could not have done it without you.
you bloody champion.
Useful, thanks!
Kevin-
You saved my laptop. I was trying to pry the laptop apart by myself after removing all screws – I am convinced I was about five minutes away from completely wrecking it. Then I stumbled onto your instructions which worked perfectly with one exception. The Alex comments about the connector are close but not what I observed. The white connector is flanked by two little black things. Those black things should be slid toward the lid which enables you to remove the keyboard cable without having to yank. Then make sure those little black things are slid toward the screen when inserting the cable for the new keyboard. Then, once it’s inserted, those black things get slid the opposite way (away from the screen) to properly seat the cable.
That’s it – works perfectly. FYI – that was on a pavilion dv6000. vivotechnology.net carries these keyboards and they are inexpensive and I received mine the next day.
Thank you again Kevin – you rock.
-Steve
I use this laptop 4 work , can’t get 2 letters to work on it. letter B4 G and letter B4 z… now, husband states I have to replace the whole board but it’s just the 2 letters, can’t I just replace the membranes or does it have to be the entire board?
Thank you, this was very helpful.
Hi kevin!
Allwent well with the switch hpwever the new keyboard has certain keys not working. Would this be instalation related or haddware related?
Sorry for the late responses.
Michelle, the easiest method would certainly be to replace the entire board. I don’t even know that it’s possible to buy individual keys.
Anthony, more than likely hardware related. I’m not an electrician by any stretch, but you may be able to use a multimeter to test the keys individually? Alternatively, try unplugging and reseating the ribbon cable connection. If you happen to have another computer you can test it in, that could be an option as well.
Best Wishes,
Kevin
Great Instructions!!! Very easy to follow. It went perfect the first time around. Took about 10-15 min being very careful. Thank You
very helpful info
colleague threw coke all over my keyboard and had to replace it.
thanks for the help mate !!
Thanks for taking the time to make this. I just changed my keyboard. My laptop was very similar, the only difference being the screws were in slightly different spots. Cost me $25.00 for the new keyboard.
Just saved our school £350 with this info.
Would have cost £350 to replace the keyboard via HP, now we can just buy a keyboard and swap it :)
Thanks!
Great !!
You did a great job by teaching the technique to open a laptop. Will it help me to open my HP56x, I have to see. Lots of regards. HariOm Raizada, New Delhi, India
Great post thank you so much for doing this tutorial, it helped me to not break my laptop while try to fix it. I needed to tighten the screws to my screen because it was wobbling and was able to access them after I took the keyboard out. Thanks again, good work!
Thanks you genius,i spiled beer over mine now enter key and arrows dont work,you wouldnt know what is the best place to buy a replacment keyboard?
Thanks, Very useful information. Many people are saving lots of money because of your this information. Thanks a ton.
Thanks Sanjeev, I’m glad I can help. This post got a LOT more attention than I had expected!
And Frank, honestly I’ve only ever bought one, and it was from ebay. As far as a particular seller, I have no personal recommendations.
thank U bro!
this is an excellent tutorial.
Kevin-
I’d imagine that the reason you get so much traffic is that the dv6000 is set to self-destruct one part at a time beginning the day after the warranty expires (grr). From one who has lost two and a half keyboards to kids so far, this time I got smart and ordered a silicone skin for the keyboard. Got it on eBay for less than $4 with free shipping from Hong Kong. Only problem is, no instructions- any ideas?
Carrie
On second review, it appears that the silicone skin just rests on top of the keyboard. Huh. we’ll see how it goes. Thanks again for the instructions, I’ve missed r and t, and most recently h and v…
Carrie
Carrie,
Ouch, yeah it does seems sometimes that these things self-destruct at the end of warranty, doesn’t it? Interesting about the silicone skin, I’m not sure exactly what it is you’re talking about, but hopefully it stays on tightly, if it’s just resting atop the keyboard.
Best of luck to you!
-Kevin
Thanks for putting this all on-line. My cat trashed the keyboard on my dv9700. The screws are somewhat different – I took out 6 silver screws and 3 black ones, then three screws inside, on the top of the keyboard.
For the cable “zif” connector, I took 2 small flat bladed screw drivers and pushed the small black tabs on the sides back towards the screen. Then the cable fits right in, after folding it. Push the black tabs back towards the front and the cable is snugged in.
I wonder if anyone makes a replacement keyboard that is more durable…
Thanks again!
Thanks Kevin! Your amazing post helped my buddy and me fix a keypad problem that I had. The instructions and the photographs were detailed and highly informative. Just wanted to let you know that the hard work you have put in has saved the day for someone.
Hi Guys,
Thanks for the posting above…I tried to fit my new keyboard into my HP Pavilion dv6835 and it seemed to work the first time..But the delete, right & left cursor, prtsc buttons didnt work. I opened it again and tried connecting the cable again but this time, the qwer keys didnt work…i tried connecting them when the pc was turned on, to see if i could check the connectivity while fixing it. Now none of the keys work except the caps lock button.
Could you please advise what I should do..? Did i damage the cable while inserting it to the pin? Should I buy another replacement keyboard?
Please advise.
Thanks.
This is probably the most useful and accurate tutorial I have ever seen. I am a bed-bound individual that was cringing at the thought of living without my laptop for 2-4 days while a repair person charged me a bundle to replace my keyboard. I found your site and went straight to eBay. $24 later and 15 minutes (I’m slow) and I’m typing this to you on my new keyboard with all lettering intact. Thank you so very much.
So, now I’m off to play World of Warcraft. Look out, Horde, my “Fire” key works again.
Preston
THANKS SO MUCH! I did it all by myself.(With the help of this site) Again thank you so much!
Kevin –
Thank you for your GREAT tutorial! Your instructions were clear, direct, and easy to follow. I appreciate the time and effort you put into this. (Ever think about technical writing as a side job?)
A shoutout to Alex for his tip about the connector lever, too!
$20, 20 minutes, and this grey-haired old lady is back online, thanks to you.
Thank you! Your directions were fantastic! I have the HP zv6000 which only requires the removal of 5 screws, other than that it’s just the same. Thank you for giving me the courage to give it a try myself! I found my replacement at: http://www.laptoppartsexpert.com- they were fabulous! I purchased my new keyboard for a mere $18 (plus $4.90 shipping). It is a brand new keyboard. Thanks again!!
yu da bomb thanx
Need to replace the power button cable on the dv6000 hp laptop. I can not get the ZIF connection that is under the keyboard to release. It is very fragile and I really don’t want to break it. I have released the ZIF that is connected to the power button under the power button cover. Please advise.
Many thanks in advance.
Diana
RAD! Thank you!! Made my day/week/Month!!
:)
Wow, this seems like a never-ending thread!
The keyboard on my HP dv6000 went out days after the warranty expired (major beeping at start-up). HP agreed to fix it. The replacement keyboard has a problem with the space key. It has to be hit hard in the middle or it doesn’t work and words run together.
Might there be anything I can do to fix/seat the space key so it works?
If not, I have another dv6000 with a cracked screen, so I could take the keyboard from that and use your technique.
Thanks.
Change it yourself and be done with it. Follow this guide and you will be done in minutes. I’m a 59 year old idiot laying here in bed on a ventilator and I did it in about 10 minutes with no problems at all. Good luck!
Thank you, Preston, glad you were able to replace yours! Eric, I’ve sent an email to you as well, but I agree simply replacing the keyboard would be easier, but if you’ve got time to mess around with it, you’ve got nothing to lose by trying to fix it! :)
kev, the instructions make it look easy. i have a dv6-1000 entertainment laptop and just got the new keyboard. itll be nice to not have to copy and paste my o’s anymore…..wish me luck, here goes nothing…
Dear Kevin,
First of all, an excellent tutorial…. it has helped me and many other evidently…
But i still had one query…how hard shud i prees the keyboard ribbon back into the connector?
shud i press hard or just slide it in gently and then lock the black clip?
Actually very rcently i had this problem where a few keys on the keyboard stopped working, all together… every day a new key wud go off!!…
when i tried your instructions, the keys not working intially started working again but some other keys stopped working…after repeating the procedure for about 10 times…the entire keyboard has now stopped working :P…i probably went too hard on the keyboard ribbon… I have already placed an order for a new keyboard. but i just neeed to know one single thing that i have reffered above.
Also, if you know the reasons for my keyboard acting strange, kindky let me know..
thanks in advance…i wud really appreciate your inputs..)
Regards
Amit
Thank you for the guide.
Though the computer is not excactly the same I managed to use it for changing the keyboard on my HP 530 laptop eventhough I thought I had tried removing every single screw before using the guide..
Thanks! I know I wouldn’t not been able to get this done without your pictures and instructions! I have a larger keyboard on the HP Pavilion 9000 Widescreen. Although I didn’t have to remove the RAM cover it didn’t hurt anything!
I was stuck on step 5 till I re-read the update.
Your are great!
Thank you so much!
This was a very well done tutorial and especially the part regarding the insertion of the ribbon. It went in easily by pushing up on the little black plastic lever at the top of the white box. I just replaced the keyboard on an Hp dv6500 and it took less than 10 minutes. Again, thank you for taking the time to help many of us out and I am sure many others in the future.
Tom
Thank you so much for posting this article.
It solved my problem!!
Thank you very very much!!!!!!!! It was very easy to follow the steps you wrote!!!
Thanks Kev! You saved our lives with your step by step instructions. We loved the photos as well. You helped us more than any IT department would. I would definetely recommend your site to a friend.
thanks for your help.your intruction were right on the money
Thanks mate, easy to follow directions best on the net getting the ribbon wire in was a slight chore but once in all fitted perfectly
Thank you for your help
Kind regards Peter
This was perfect for me! Thanks so much for taking the time to do this. I followed your instructions and they worked great!
Thanks so much! You saved me $390. I ordered a Chinese keyboard for under $30 and with your excellent tutorial I fixed it myself and I have ZERO computer know-how.
Great tips. I know the photographs are a pain to work through, but they really give one the warm and fuzzy feeling throughout the process. Thanks.
Thanks a lot Kevin. This was exactly what I was looking for. The instructions couldn’t get any better (of course, a youtube video would have made it easier to find).
I got this at Sam’s Club as a clearance item for $150. It was a display, so people had a chance to screw with it, so it was missing 10 keys. HP wouldn’t stand behind it (very unusual for them) and wanted to sell me a new keyboard module for $56. I found it on eBay for $9.95. With the deal from Sam’s, the vendor on eBay and your clear instruction, I have a hell of a computer for even twice the price. Thank you, thank you, thank you.
Hi, Kevin,
My 2 year old picked off 25% of the keys from my HP Pavilion dv9208nr notebook. I ordered the replacement from HQRP for $19.99 (with shipping it was about $27.00). I used your guide to remove and install since the models were visually very similar, and it works fine! Thank you very much!!
Sincerely,
Judy
Philadelphia, PA
Kevin,
I am forever thankful for this post. I am a complete tech newbie and took a risk by purchasing a keyboard on ebay and trying to install it with these directions you posted. Needless to say I am typing to you right now with my new keyboard. It was easy and I did it all in about 20 min thanks to your pictures and directions. Yes inserting the new cable into the slot was a pain because I took a while to locate the black lever that was underneath the white box, but other than that, my installation went without a hitch. I recommend this to any and everyone. Saved me hundreds that would have been lost if I sent it in to HP. Thanks again and keep it up!
Nick
Thanks for description..Very Helpful.. Great Job!!!!
Thanks for the guide, it helped me with a HP nx7400.
Cheers!
Thanks so much for this, your pictures helped with putting the cable in because I thought the cable wasn’t going in all the way, but after zooming in on my iPhone I noticed it was fine, very helpful. I used this for a dv6265us, same keyboard, just a little annoying locking the LCD back into place to screw it in afterwards.
Than you!
Ciao, after one cup of thea, my laptop was death…
Thank you to save my laptop and my money (250 euro for hp assistance….and 20 euro for buy the italian keyboard on ebay)!!
Grazie grazie grazie!
ciao kevin, God bless you!
I’m so glad to have found this tutorial! I have a dv6500 and also sent off for the keyboard after mine got destroyed. And as soon as I get up my nerve I’ll begin replacing the keyboard with this excellent thread open, of course.
Thanks for taking the time, Kevin.
Just changed my keyboard(DV7) using your instructions worked a treat glad you mentioned the cable retaining levers i had two one on the keyboard and one connected to the top shield bit fiddly but you saved me money cheers
Gracias desde Perú!! Con tu ayuda fue más facil de lo que pensé!! Ahorré mucho dinero!!
Thousand of thanks for the time you spent to illustrate your process of changing a keyboard. I took me exactly 4 minutes to do the job.
Best regards,
Craig
Thanks so much for the detailed directions..I fixed it myself in 20 mins, and it was inexpensive. Great!!!
Kevin,
It looks like it has been a couple of years since you made your tutorial on the keyboard replacement. I too would like to first of all thank you for the trouble you went to and secondly tell you the way you put it together is professional all the way. My niece came to visit with her 5 week old and I watched her pull out her HP DV6000 along with a full blown m/s keyboard + the A/C charger. She told me HP wanted $175 to replace the keyboard. I ordered a new one from “screenaid” on E-bay for a total of $13.79 on a monday and had it in my mailbox on Thurday. I searched You-tube for installation video for quite a while without any luck. I was about to try and find a similar model but Googled it and found yours. My lucky day, not to mention Katie’s as well. 10 minutes tops. This is your calling Kevin! Could not have been any more on target. Now we are waiting for the new battery and she will be back in business.
Oh, and by the way I told Katie when I removed the old k/board it looked like the remnants of baby formula and a double latte had dried up in there. Thanks again Dano
Many thanks for your excellent advice and extremely useful photos! Everything went well until I tried to get the keyboard cable reconnected to the white connector. This is in the area of your note:
——————
First, carefully insert the new cable into the slot. Be careful not to damage it, the cables are fragile.
Update: “The connector slot has a lever the pins are connected to the white box and the black lever at the bottom of the white box can be pulled towards the screen. This will loosen the keyboard cable. If you press that black lever back it will fix the cable.” Thanks, alex for the tip!
———————–
I tried many times, and each time after assembly the keyboard worked except for a ‘band’ of keys; ty-gh-bn, for instance. Next time it was qw-as-zx. Turned out it was that pesky black ‘lever’, or compression strip.
I finally tried securing the cable, FIRST
previous note, continued:
I used scotch tape to make sure the cable didn’t slip out, then with the scotch tape holding the cable in place I concentrated on getting the black compression ‘lever’ snapped in. Worked like a charm.
Again, thanks so much for your efforts
Don Caley
I found two black compression “things” on each side of the white box that the cable connected to. I too had a hard time keeping both of those slid out in the “up” position, while simultaneously inserting the cable completely, but by folding the cable similarly to the old cable I was able to keep it close enough to the box to push it in and then secure it by pushing in the two black slidey “things” on each side. Thanks everyone and especially Kevin!
I desperately need that black clip (zif connector) does ANYONE know for sure how to get one, based on past experience? Please help!!!
Will the clip come off/on the connector if you had one or is it somehow attached perm. and require MB replacement? I’m looking all over for just a clip for you. Good luck.
Preston
Kevin, Thanks for the great post and pictures. I was able to help a friend replace his keyboard today. Could not have done it without you.
It may be the 160 Comment, it might have helped lot many people more.
Thanks a lot Kev for a great Post.
This post is the gift that keeps on giving. My laptop and I are eternally grateful.
This is awsome. Thanks !!!
Ps. is compatible with DV6500SERIES
Thanks Kevin
Your pictures were very usefull even I have a HP pavillion 9600. Less screws and there was no need to remove the RAM cover but espacially the way to lose and fasten the cable. My dealer told me a keyboard couldn’t be replaced and no buttons were available. Thanks to a brand new genuine HP keyboard I bought through Ebay ($15,-) my laptop is as new. Many thanks.
A few tip for 9600 users that read your site.
1. On the right side of the speakercover is a little clip to losen the cover.
2. To remove the cable push the 2 little clips next to the connector forward to losen the
losen the cable.
Thanks again
Leo
Great post Kevin, very well illustrated. It took me approx 15mins to do the job.
Thanks,
Thanks for the how to info on replacing a keyboard on an HP laptop. I was able to replace my daughter’s broken keyboard with a brand new one in under 20 min. Your instructions were spot on and easy to folo. Well done Kevin.
Many thanks for this excellent guide.
Just successfully replaced the keyboard on my HP DV2700.
hi kevin
i tried it. but broke my keyboard’s cable slot. what to do now. will i get those slot lever’s in market. My lap is hp6515b. please reply
I have an HP 5210. I had a bit more screws to remove but your step by step gave me confidence. The pictures were worth more than 1000 words. I lost the other keyboard to my 2 year old and have had the new keyboard sitting around for almost a year using an external keyboard. I can’t thank you enough, it is funny how some of your friends had jokes, you just have no idea what a blessing you’ve been, but then again you do because look at all the posts!
Thenk you very much for taking the time to do this!
Thank you very much!!!
Your illustrated instruction and a $12.00 oem keyboard from ebay saved me a ton of headaches.
Kevin
Thanks so much for the photos and instructions. I bought my daughter a used HP6707 on ebay and it had a couple keys that seemed stuck down. Prying the key off I noticed that the silicone “tube” on which the keys are mounted (inside the articulated mount) were actually broken and the keys, while they worked, were not bouncing back. I originally just put a little bit of rubber inside to make them the right height but didn’t like the lack of “feel”.
A new keyboard was less than $20 and it took me, using your great instructions, about 30 minutes to change the keyboard for the new one.
Thanks again amigo.
Reggie
thank kevin this was bloody brilliant saved me money cheers
Hey . . . Do you have a guide (with pics of course) on how to replace the hard drive on the same model??
Thanks for this guide . . . It’s the best I’ve seen on the net!!!!!!!!
Kevin,
Thanks a million for this guide! It’s brilliant!
maravilloso me sirvio muchisimo gracias
Thanks
Great guide for risk avoid(Save money!)
Hi Kevin, thanks for the guide
I’m so stressed, everything went fine I just can’t get the keyboard shield to go down
like on the left side (the side the power button is on)
won’t snap down properly, I dunno what to do, any advice ?
i had kinda the same problem for a second make sure the ribben cables are not in the way that was my problem..the screws pull it all together..
Same thing happened to me before I went and fixed it myself. As the one before me said, make sure that there are no cables in the way (I JUST fixed my keyboard right now, and the left side is securely in place…for now, otherwise I’m not fretting, as long as my keyboard works!).
Worked great…thanks!
wow worked like a charm made me a hero to my wife might even get a bonus..lol and to thing a technician would charge upwards of 100 bucks to replace this keyboard i did it for 16 bucks
got the keyboard on e-bay brand new this morning and was done in about 15 mins and that was being careful and double checking everything..great info thank you..
Thanks a lot!!! I have a DV7 but it’s almost the same. You have saved me not only the replacement costs but also the cost of a new keyboard, because mine just needed to be cleaned (I dropped juice over it).
Thank you for an excellent tutorial! Got my computer working like new in about 30 minutes.
Awesome. Your help is much appreciated.
hi,
u saved my day ..
will try to replace the keyboard on my dv9880ee ..
thx ..
Dude, thank you for doing this walkthrough! It saved my bacon-
Omg thanks. Hp was charging me 300 jus to get my keyboard fixed
Rockin how-to. Thanks! Bought a cheap replacement and made hubby follow your guide and now my lappy is happy and so am I!
Thanks for the great tutorial on replacing the laptop keyboard. Mine is still working, but I was starting to have reason for concern. The pics look like a pretty close match for my hp dv9100us. I have replaced screens before, and done some other repairs on laptops, including keyboards, but seeing this for an hp makes all the difference in the world…where those snaps are, which screws, even the whole ‘logic’ of the design, etc. When I’ve repaired corporate machines that’s one thing, when I’m taking ‘baby’ apart that’s another. Very well done.
Earth Hour in 2010 comes about on Saturday 27 March and is really a global call to action to each and every individual, just about every enterprise as well as each one neighborhood throughout the world.
Are going to you be involved?
Do you dissembled HP DV6915EE model i want to replace touch pad of it
Thanks
Vijay
cell 0091 9833086092
Thanks for these detailed instructions. I was able to change the keyboard on my HP dv6000 in less than 45 minutes
great guide you saved me from a stupid repair bill
Hey. I have a the HP dv4-1225dx laptop and I need to replace the keyboard. Problem is that it is surrounded (for lost of a better or a more techy word) by the speakers, so i’m not too sure how to go about removing it. =(. Help Please!
Thanks in advance.
I have hpdv600 my issue is that it continously trys to boot up but does not start. there is no screen and you can see that the power is starting again and again. when it works it is perfect it just does not start all the time. somtimes it starts right up other times not at all. I have let it sit for an hour and nothing. Any help?
Jim
How do you get to just the touch pad keys to work on them?
Hi Kevin,
I have an HP G7000 series laptop and was struggling to get remove the keyboard (the HP maintenance guide doesn’t say the third screw is under the RAM cover. Thanks for the tip, you’ve saved my laptop.
Thank You,
Your hour, saved me at least 3.
You gave me 2 extra hours on a Sunday,
Thank you
Kevin,
Thank you for this very valuable information. Staples wanted to charge me $375 to fix this problem and Best Buy wanted to charge me $85.00+, if the laptop had to be sent out. I only spent $11.65 for the keyboard replacement on Ebay and I followed your instructions. I am grateful. Thanks again. It was a nightmare trying to copy and paste a letter or a space when I needed to send an email. A simple email (5-lines) took 20 mins.
Thanks again!
Hey, thanks a lot. That was easy as pie. It took me maybe 15 minutes and I love my new keys!!! Thanks for taking the time to put this together.
Thanks for the great How-to, helped me save my friend’s laptop.
after going to so many websitaes and supports i finaly found something that gave me an idea on how to replace the keyboard of my f572us presario the similarities to hp was a big help.thanks!
thank you thank you thank you
Your article got me almost there.., but…, I still didn’t understand the ZIF and LIF. Thought I’d share what I learned. While replacing keyboard on DV6700 had to replace ribbon cable from power button board to system board. For the ZIF connector at the power button board – pull ZIF connector outer plastic edges axially away from connector…, on the sides (white or brown). Cable then comes out with zero force – like several posts above…., I suggest that you dont’ wiggle this end of the cable till you pull the ZIF side plastic pieces out. Ribbon cable can them come out with no effort. Once that end of the old ribbon cable is out of the ZIF connector…, insert new ribbon cable in the ZIF (note which side goes up) with ZIF plastic side pieces out – takes zero force. Once the ribbon cable is “in” the ZIF connector, push plastic side ZIF pieces back in to lock the cable/connector. On the other end of the ribbon cable (at the system board), I found what the manual calls a LIF (Low Insertion Force) connector. After attempting to learn all I could about it.., finally figured out there were no moving parts. Simply pull ribbon cable straight out (opposite of the ZIF where you never pull without the ZIF unlocked). On the LIF…, once the old ribbon cable is out, push new cable into the LIF – will take a “low” amount of force…, should go easy if you use a new cable. I purchased a new cable on ebay for less than $5 (find it on ebay by searching for 431437-001). Good luck
You should be writing instruction manuals for a living, if you aren’t already doing so. I am writing this on my newly installed keyboard, replacing the one that my dog ruined by clawing some of the keys off of it. It couldn’t have been easier! I am not normally a do-it-yourselfer, so I was a little apprehensive about it, but your instructions made it a breeze. Thank you so much!
Mike
Precise details on the ZIF connector that secures the ribbon cable: the cable slides under a black plastic pressure-pad. The pressure-pad is held down by two white T-shaped plastic pegs.
To release the cable, slide each T-peg away from you (towards the base of the screen). The pressure-pad is then loose, and the cable easily slips out.
When inserting the new keyboard, slot the front (bottom) edge in first, then with fingernails ease its left and right edges down into the opening. There is slight resistance as the keyboard compresses the fold in the ribbon cable.
Step by step instruction nice work it’s very helpful. thanks
excellent post. you saved me a ton of time. great job and thank you
Thanks so much for taking the time to post step by step idiot proof instructions.. I just swapped out my keyboard in half an hour and have never done anything like it before…. The only problem i had was getting the cable back in. What a pain in the rear that was.. After a few swear words i finally managed it, I was trying to push it in under the black clip, not on top… Anyway.. My husband will be so pleased when he comes home and its fixed!!! Thanks!
It was very helpfully! Thank you very much!!! Kevin, you are the best!!!!
Awesome! Really! I got a new keyboard off ebay for 18 bucks and installed it using these instructions. Took me about 25 minutes. Never would have tackled it myself without such clear instructions. Lord only knows how much HP would have charged! Thanks!
Does this work for the Dv5 too. Thanks in advance
regards,
sandeep.
A+ Tutorial – Well done indeed.
3 Years later and still going strong! Thanks.
Jim
15 months and still working great. And, still reading every post by other very happy people. Thanks again.
Preston
Thanks, worked perfectly.
Great work.
I got a Toshiba laptop but, can’t stand the keyboard, it is hard to use and I can’t return the laptop (couldn’t look at it first either since it was a bargain) can I replace the keyboard with another Toshiba laptop one that I do like?
Thanks for the tutorial, Kevin. About 10 of my keys stopped working out of the blue so I figured I was due to clean all my keys again. So, I removed all my keys, put them in hot water, and put them back on and they still didn’t work. I got scared I would have to buy another laptop but then I decided to search Amazon for a replacement and found one for $15…what a great deal and it only took me 20 minutes to replace.
You rock!
Thanks,
Andrew
I have an HP Pavilion dv6-2150us and there are (I lost track now but I believe) 3 more screws under the harddrive cover. One of them is right there under the cover, but the other 2 can’t be seen until you actually lift the drive up.
Now, turning the computer back over (keyboard facing up) there are 3 small metal colored screws that you have to unscrew to get the top of the keyboard out. It is a bit difficult because I could not pop up the front flap all the way, but I held it up just enough to get a small screwdriver in there to losen them, and then I used a small magnet to extract the screws out. I used my wife’s tweezer to place these screws back in after inserting the new keyboard.
Also make sure you scroll up to read a helpful comment regarding the power strip removal. Don’t yank it. There is a black keeper that pops open toward you!!
Thank you for taking the time to post these instructions. I just took my HP Pavilion apart to look at replacing the keyboard. I have the HP Pavilion dv6358se which is a little different but basically, it worked. I was so excited when I turned it on and it worked. Thank you very much!
My wife has an HP laptop whose ert keys have been worn off. I ordered a replacement as soon as I stumbled onto your site. The keyborad arrived yesterday and thanks to the great directions here I repaced the keyboard in about 27 minutes.
Hi Kevin,
I followed all your instructions but when i turned my computer on it said, operating system not found? What did I do wrong? Do you think I lost everything? Any thoughts would be appreciated.Thanks!
Alex
Thanks for all your help. I replaced my keyboard with no problems. I really appreciate your help, you’re a lifesaver. Corbin
Thank you! This site and another one really helped me out! My keyboard completely crashed on me and I was banging (literally) on it from frustration until I got here and read up the instructions. Turns out the cable connecting the keyboard to the computer was loose…really loose. Heh…
Thanks for the very helpful instructions…worked great. I ordered a $10 replacement keyboard on Amazon, and followed your advice.
Aloha!
Thanks, the images and captions were so simple and precise – much appreciated.
Wonderful description. I was dreading this and you made it so clear and simple. Thank you. And thanks to Alex for the tip – I NEVER would have seen those little black levers.
Thanks, Kevin! This was super-clear and very easy. I’ll donate shortly.
Well, I just realized that you’re independent of “inside my laptop” and don’t have a mechanism for donation, so I’ll say Thank You (!) again!
Haha, thanks anyway, Frank. Definitely no need to donate, just glad that sharing the experience can help!
I’ve been following every post here since I repaired my DV6 using your guide in August 2009. I’ve really enjoyed reading the comments and seeing so many others benefit as I have.
I still have, and use, my DV6. I now also have a DV7 that needs a new keyboard. Anybody know if it is similar to the DV6? Thanks for any input you may have to offer.
Incredible! The directions were spot on, images are crystal clear and large enough for an old man (53) to see, a PERFECT how to.
Only have one complaint, the new keyboard doesn’t spell any better than the old one :-)
Thanks a million for posting this!
Ed
Great instructions! Thank you!!
Hello, great tutorial.
I have a HP Pavilion DV5000. Quitting the keyboard is like this.
But somebody did it with the Mouse touchpad
Hello, do you think this method would also work for an HP dv7t-2000 laptop?
Thank you!
It regularly amazes me precisely how website owners for example your self can find enough time and the commitment to carry on making terrific blog posts. Your website isgreat and 1 of my must read web sites. I just had to thank you.
Just like to thank You for saving us several £100’s of pounds on either having our laptop repaired or replaced. Clear & concise info made replacing the keyboard a very simple operation.
One update for You; We have a 17″ screen & for this model, You don’t need to remove the RAM cover, as there aren’t any screws under their which need removing. That screw is to the left hand side of the RAM cover.
Again, thank You :-)
You’re in reality a just right webmaster. The website loading velocity is incredible. It kind of feels that you are doing any unique trick. Moreover, The contents are masterpiece. you have performed a great process in this topic!
Simply desire to say your article is as astonishing. The clearness on your post is just excellent and i can assume you are a professional in this subject. Fine with your permission allow me to grasp your RSS feed to keep updated with coming near near post. Thank you a million and please carry on the enjoyable work.
thank you ,i will do as you said
i buy laptop parts from http://www.pcpartsltd.com
Thanks so much – I think I may have saved my laptop after a slight accident with a glass of water. Everything else worked okay – well the USB hubs don’t have as much power, but a powered hub fixes that.
I did this on an HP dv8t – the little black connector Alex talked about actually flipped up. It took me a bit to figure it out. Also, the screws were in a couple different locations – but it wasn’t hard to figure out.
Another thanks for posting this comment. I’ve probably replaced a couple dozen laptop keyboards in my day but couldn’t easily figure out how to get into this one. I wish I had googled first before I pulled out about 20 screws, the memory, hard drive, dvd drive, and battery. Pretty simple once you know which screws to take out, thanks!
Fantastic Instructions Kevin! I attempted by myself and missed one of the screws and was afraid to damage things more. By looking on the fantastic Google found your great instructions! Many thanks and keep the good Work! João Humberto.
You really make it seem so easy with your presentation but I find this matter to be really something which I think I would never understand.
It seems too complicated and very broad for me. I’m looking forward for your next post, I’ll
try to get the hang of it!
Great how-to! still useful in 2013.
Replacement keyboards for this (and many other models) are available for under $20 on Amazon.
With your help and the comments about the zif socket/cable, this old dv6500 is good to go again!
Just wish the operating system didn’t still suck… ;-}
“HOWTO: Replace Keyboard on Laptop Computer (HP dv6105) | Kevin” truly
enables me contemplate a somewhat more. I appreciated each and every single element of it.
Many thanks -Karol
Thank you SOOOO much for this tutorial!!! My kids decided to pop almost all of the keys off my laptop (hp pavillion dv6000) then my puppy chewed up the keys before I could find them all. I had no idea how to replace the keyboard, then I found this tutorial and got everything working perfectly! Thanks again! Now to buy a silicon cover for my keys…
Hey there, I think your site might be having browser compatibility issues.
When I look at your blog site in Safari, it looks fine but when opening in
Internet Explorer, it has some overlapping. I just wanted to
give you a quick heads up! Other then that, fantastic blog!
Nice weblog here! Also your site a lot up fast! What host are you the usage of?
Can I get your affiliate link to your host?
I want my web site loaded up as fast as yours lol
[b][url=http://www.handbagsvk.com]hermes handbags[/url][/b] naturally the hoopla since the skin tightly held lean varieties, celebrities coupled with stars desire Halle barry, Regina king, Penelope jones and as well as Kate Moss are unquestionably putting on a much wider-Legged personality in this result. other than that, I do not other conditions when applying H2000 pda. A carryall is typically made from managed fabric, nylon or toxic pebbled set.
[b][url=http://www.cosobags.com]hermes handbags[/url][/b] season air, can the actual be rather past due? nonetheless, fashion? fashion? generally worry. squandered in the fashion arena, there are actually bunches of really good inclination until this summer and spring, that a veritble tidl wve, regarding development. Vivian Chloe alligator handbags can be described as bag, the definition of design, vogue and magnificence.
[b][url=http://www.bagsseala.com]hermes handbags[/url][/b] the reasons why engaged in he never ever gain shot concerning piracy the grapefruits out of the research suite? i came to be in that respect there and also Sgt R. must have been seeking the two authorities. this had been a horrible instance of a sgt. additionally, Louis vuitton retailer be certain louis vuitton you won’t incurring notice implementing car loan company purchases or just banking institution cables, As it’s the fastest strategy for getting scammed. with your financial institution is generally the simplest hermes buckle prospects, But you also need to louis vuitton wholesale handbags look for cash-in the past makes deciding on what bring home. When the corporation tries to beat because of dre minus louis a single, you can you should definitely get money-in turn.
[url=http://www.nb-xy.com/weichuangbbs/showtopic-512547.aspx]Hermes Belt Uk[/url]
[url=http://www.ci8.net/space.php?uid=56230&do=blog&id=233991]Hermes Belts Sale Authentic[/url]
[url=http://yyss.577web.net/bbs/forum.php?mod=viewthread&tid=434838]Hermes Style Bag[/url]
[url=http://20lou.cc/forum.php?mod=viewthread&tid=748142]Hermes Brown Belt[/url]
[url=http://221.202.129.162/web1/uchome/space.php?uid=3100&do=blog&id=34454]Where To Buy Hermes Belts[/url]
Hi, i read your blog occasionally and i own a similar one and i
was just wondering if you get a lot of spam feedback?
If so how do you prevent it, any plugin or anything you can recommend?
I get so much lately it’s driving me insane so any support is very much appreciated.
wonderful submit, very informative. I wonder why the other experts of this sector do not realize this.
You should proceed your writing. I am confident, you’ve a huge readers’ base already!
So was könntest du in Sexclubs eventuell noch erleben.
Es ist wieder soweit: Die Sonne brennt vom Himmel und die schicken Damen flanieren durch
die Fußgängerzonen. Und die Welt ist nur einigen Mausklicks entfernt.
Have you ever thought about publishing an ebook or guest authoring
on other sites? I have a blog based upon on the same ideas you discuss and would really like to have you share some
stories/information. I know my visitors would enjoy your
work. If you’re even remotely interested, feel free to shoot me an e mail.
These games are created as such to use your detective abilities to
its fullest; these games test out your presence
of mind, how quick and accurate you’re in solving out these puzzles. Kentucky horse heritage is long and proud, from Thoroughbreds to Quarter horses and every four legged phenomenon between, and traces of computer can be seen in almost every town and city throughout the region. For people that want a gaming laptop, the style is not very important or.
I’m gone to say to my little brother, that he should also pay a quick visit this web site on regular basis to get updated from latest reports.
Pretty nice post. I just stumbled upon your blog and wished
to say that I have really enjoyed surfing around your blog posts.
After all I will be subscribing to your rss feed and I hope you write again soon!
Thank you for the good writeup. It in fact was a amusement account it.
Look advanced to far brought agreeable from you! By the way, how could
we be in contact?
Just want to say your article is as surprising.
The clearness on your put up is simply excellent and that i can assume
you’re a professional in this subject. Fine along with your permission let me to seize your feed to stay updated with impending post. Thank you one million and please continue the enjoyable work.
Greetings! This is my first visit to your blog! We are a group of volunteers and starting a new initiative in a community in the same niche.
Your blog provided us valuable information to work on.
You have done a marvellous job!
Quality articles or reviews is the key to attract the viewers to visit the web
page, that’s what this site is providing.
Do you have a spam problem on this website; I also am a blogger, and I
was wanting to know your situation; many of us have developed sokme nice
procedures and we are looking to swap strategies with others,
be sure to shoot me aan email if interested.
Hey would you mind letting me know which web host you’re
utilizing? I’ve loaded your blog in 3 completely different internet browsers and I
must say this blog loads a lot faster then most.
Can you suggest a good web hosting provider at a fair price?
Cheers, I appreciate it!
Very great post. I just stumbled upon your blg and wanted to sayy that I havfe really lpved browsing your weblog posts.
After all I will be subscribing to your feed and I am
hoping you write once more very soon!
My gay pictures
http://men.sexblog.pw/?info-tanner
you gay gay wrestlers man gay gay sax gay roommate
i am 30 is cialis beneficial
[url=http://buycialis-us.com]buy cialis
[/url] effects of cialis soft on women
– buy cialis
Attraсtive part of content. I just stumbled uppon your weblog and in accession capital
to assert thatt I acquire in fact loved account your blog poѕts.
Any way I’ll be subscribing for your feeds and even I achievement you get admission to persistеntly fast.
First you get San Fierro then you get Las Venturas. The consequences for Sony could be dire; to that end, the company has asked for a restraining order against the group.
Phone calls that lasted for more than an hour, flirty smiles are exchanged.
thanks for this awesome instructions,
i like this because many pictures to explained ,
thx a lot
I all the time used to read paragraph in news papers but now as I am a user of web thus from now I am using net for posts, thanks to web. kkbebgceedke
I like the valuable info you provide in your articles. I will bookmark your blog and check again here regularly. I am quite certain I’ll learn a lot of new stuff right here! Best of luck for the next! gefbddeackac
Heya i am for the first time here. I came across this board and
I in finding It really useful & it helped me out a lot.
I am hoping to give something back and help others like
you aided me.
Quality posts is the key to attract the users to pay a visit the web page, that’s what this site is providing.
Hello! I’ve been reading your blog for a long time now and finally got
the courage to go ahead and give you a shout out from
Kingwood Texas! Just wanted to mention keep up the fantastic work!
Hi i am kavin, its my first occasion to commenting anywhere, when i read
this paragraph i thought i could also create comment due to this good
article.
Excellent article. I certainly appreciate this site.
Keep writing!
With havin so much written content do you ever run into any problems of plagorism or copyright infringement?
My blog has a lot of unique content I’ve either created myself or outsourced but it seems a lot
of it is popping it up all over the internet without my agreement.
Do you know any methods to help prevent content from being ripped off?
I’d truly appreciate it.
The other day, while I was at work, my cousin stole my iPad and tested to see if it can survive a forty foot drop, just so she
can be a youtube sensation. My iPad is now destroyed and she has 83 views.
I know this is totally off topic but I had to share it
with someone!
Usually I don’t learn article on blogs, however I would like to
say that this write-up very compelled me to
take a look at and do it! Your writing style has been amazed me.
Thank you, quite great post.
Hi there to every one, the contents present at this web
site are truly awesome for people experience, well, keep up the good work fellows.
Today, I went to the beachfront with my children. I found a sea shell and gave it to my 4 year old daughter and
said “You can hear the ocean if you put this to your ear.” She placed the shell to her ear and screamed.
There was a hermit crab inside and it pinched her ear.
She never wants to go back! LoL I know this is totally off
topic but I had to tell someone!
I was suggested this website by my cousin. I’m not sure whether this post is written by him as no one else know such detailed about my trouble.
You are incredible! Thanks!
Spot on with this write-up, I really feel this amazing
site needs a lot more attention. I’ll probably be back again to
see more, thanks for the info!
Very good article. I’m going through a few of these issues as well..
Very good write-up. I certainly love this website. Thanks!
Hello there! I could have sworn I’ve been to this blog before but after browsing through a few of the posts I
realized it’s new to me. Nonetheless, I’m certainly pleased I stumbled upon it and I’ll be book-marking it and checking back regularly!
Hello to all, it’s actually a good for me to
visit this website, it includes precious Information.
I just like the valuable info you provide for your articles.
I will bookmark your blog and test once more
here regularly. I’m reasonably certain I will learn many new stuff
proper right here! Best of luck for the following!
Very good information. Lucky me I came across your site by accident (stumbleupon).
I have bookmarked it for later!
That is very interesting, You’re a very skilled blogger.
I’ve joined your rss feed and sit up for searching for extra of
your magnificent post. Additionally, I have shared your website in my social networks
Amazing! Its in fact awesome paragraph, I have got much clear idea regarding from
this post.
Its really a great post…
I do not even know the way I ended up right here, however I
thought this publish used to be great. I do not recognise
who you might be but certainly you’re going to a well-known blogger for those who are not already.
Cheers!
Hot sexy porn projects, daily updates
http://amateurthemovie.ebonyellisemory.hoterika.com/?deasia
free xxx dog porn videos best celebe porn porn big tits suck 18 porn porn in wisconsin